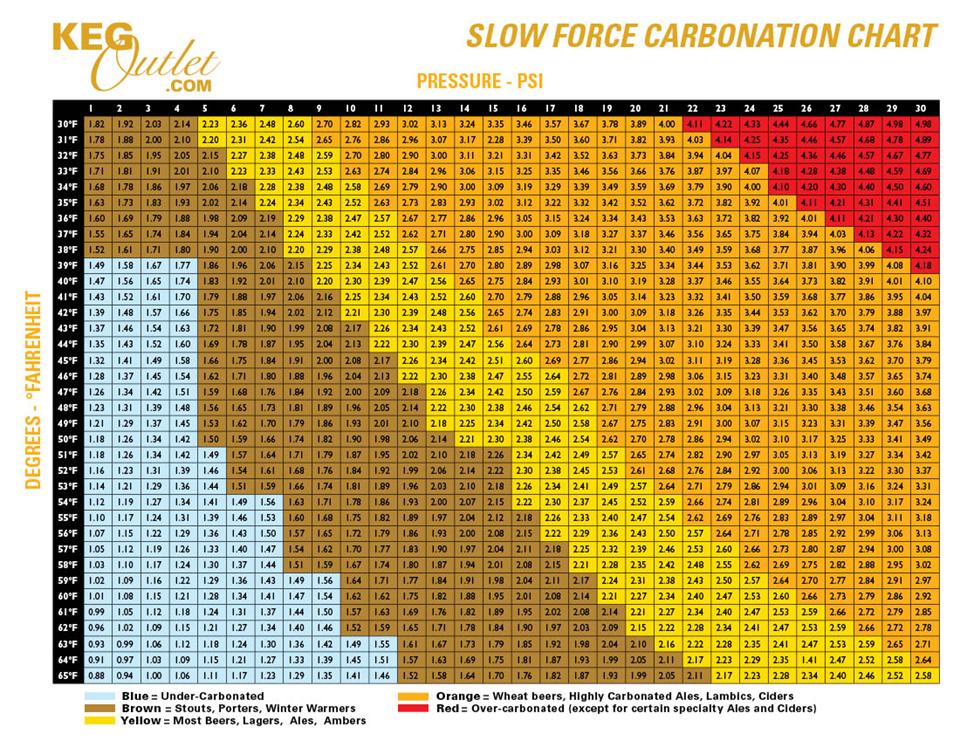
 This Keg Carbonation Chart (at the bottom of the page - click to scroll down) is designed to help you decide what pressure to set your kegs at depending on the temperature that they are at, and what style of beer is in them.
Two Methods of Force Carbonating Beer
When carbonating there are basically 2 main ways of force carbonating. The first method we will refer to as the "slow" forced carbonation method. The second method we will refer to as the "fast" forced carbonation method. Using either of these methods you need to ensure that the beer that you are force carbonating is cold when forcing the CO2 in. Cold beer accepts and holds the CO2 much better than warm or room-temperature beer.
What you will need to Force Carbonate Your Beer
Before the brief explanation of how to keg your beer, here's a quick list of items that you'll need.
- 5 Gallon Cornelius Keg (Ball Lock or Pin Lock)
- CO2 Tank
- Dual Gauge Pressure Regulator
- Beer Hose Disconnect with Beer Hose and Faucet Tap
- Gas Hose with Gas Line Disconnect
- Quick Carbonating Corny Keg Lid (help speed up the carbonation process)
Or, if you're just getting started, you might find it easier to get a complete kit
How to Force Carbonate Your Beer
SLOW Forced Carbonation Method
Although this method takes a little longer, the chances of having over-foamed beer when first tapped are a bit less.
- Transfer your COLD homebrew beer into the keg, attach the lid, and add some CO2 to ensure a seal.
- Select the desired carbonation lever (refer to the cart below) and set your regulator to that pressure.
- Place keg upright in the fridge and attach the CO2 line. Leave at desired pressure for about 5 days and your beer will be ready to drink!
- Note: Before serving, you may need to lower the pressure (depending on what pressure you were carbonating at) to somewhere between 6-10psi so that you don't just pour a big glass of foam.
FAST Forced Carbonation Method
We are big fan's of being able to drink our beer as soon as possible, so the method we typically use this method of forced carbonating beer.
- Transfer your COLD homebrew beer into the keg, attach the lid, and add some CO2 to ensure a seal.
- Lay keg on its side, crank your CO2 up to about 15-25psi, and roll/shake the keg back and forth for 5-6 minutes or until you hear your keg stop "gurgling".
- Stand keg upright in the fridge and remove the CO2 line and let settle for a couple of hours.
- After a couple of hours refer to the chart below, select your desired pressure, and set your regulator to that pressure. Let off any excess pressure that may be in your keg still, and attach the CO2 line.
- Let it sit at this pressure overnight, or about 24 hours, and your beer will be good to go.
- Note: Before serving, you may need to lower the pressure (depending on what pressure you were carbonating at) to somewhere between 6-10psi so that you don't just pour a big glass of foam.
Using the Keg Carbonation Chart
The Slow Forced Carbonation Chart Below features a graph that uses pressure vs. temperature. The interior numbers of the chart refer to the Volumes of CO2 that will be present in your beer after carbonating.
- Figure out what style of beer you will be force carbonating.
- Figure out what temperature your keg will be at while carbonating.
- Find where the color (style of beer) and temperature meet on the chart. This should be your desired force carbonation pressure.
Note: Depending on your beer, you may notice that you are able to choose from a range of pressures. This is where you can take the liberty to add in your own personal preference; If you prefer a beer with a little more carbonation, go towards the high end of what the chart is telling you. And on the other hand, if you prefer a less carbonated ale, set your pressure on the lower end.